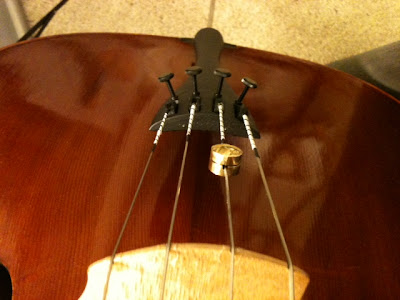
I also forgot to bring my bow because I had to run home from work, pack it up and bring it to him. I guess its pretty important to bring your bow to test these things out...oops! Anyway, I couldn’t reproduce the buzzing sound, but he adjusted the bridge and fine tuners, which made a huge difference. My cello sounds much more mellow and deep again like when I first got him. A happy mellow cello! :)
This is a great YouTube video from David Finckel's Cello Talks on cello maintenance: Talk 94: Cello Physical
The video is definitely way more advanced than what I'm comfortable doing, but its a great overview and something I can look forward to learning in the not-so-near future. I'm still afraid that I'll some how break my cello, so I'm content in having my luthier do the adjustments!
He went over some cello maintenance:
- Center the bridge
- Make sure that the bridge’s feet is centered between the two black dots. I didn’t realize there were two black dots there! But the bridge was definitely not where it should have been
- Make sure the bridge points upwards
- Make sure bridge is pointing straight up and not tilted to the left or right
- Good examples on the YouTube link of how bridges should not look like (see end of YouTube video)
- Loosen fine tuners
- Make sure the fine tuners are not wound up so tightly. I need to start using pegs to tune my cello, I’m still using the fine tuners…oops! It takes much longer tuning with pegs, I guess I have to get used to that. Adam had loosened these during my previous lesson, but I wound it up again
- I took a picture of my fine tuners afterward so I could reference how far the screws should be sticking out.There definitely a LOT taller (sticking further out) than they used to be, and bowing feels a lot easier
Other items we covered:
- The endpin plug is correct, and it's in as much as it can be. Adam had asked if I could ask the luthier to put the plug in deeper
- Removed extra shavings – the black flakes that I saw inside of my cello were from the shavings that fell into my cello when it was being put together in the factory in China
- My cello doesn’t have a perfectly straight fingerboard so my bridge isn’t aligned to that. He was more concerned that the bridge should be aligned between the two f holes to get a better sound, which is why the dots were placed there to ensure the correct location
He asked if my teacher knew how to put on the wolf tone. I said yes, but I had a feeling that he had a different way to put on the eliminator, so I asked him to double check. And he did it completely different, which was actually a pretty cool way...
How Reed put on the wolf tone eliminator:
- Find where the wolf is - I thought mine was on E on the D string, but when I got home the wolf was on my f sharp!! So I repositioned it, which is why the picture of the wolf tone eliminator above is farther from the bridge. The picture below is where it is currently (wow, iphone photos rock!)
- Place the wolf tone eliminator on the string between the bridge and the tailpiece (most commonly on the G string)
- Bow on the string between the bridge and tailpiece (see below) to find the same note the wolf tone in on. Do this by looking at a tuner and moving the eliminator closer or farther from the bridge. It sounds pretty bad (high pitch squeeling!) bowing in this section, but the tuner will pick up the note (surprisingly!)
Jeez, its only been two months and I’m already bringing my cello in for adjustments. I wonder if I’ll be like one those paranoid parents who bring their kids in for checkups because of minor colds and scratches! Oh well... my cello is my baby! :)


No comments:
Post a Comment